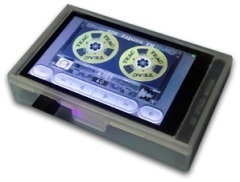
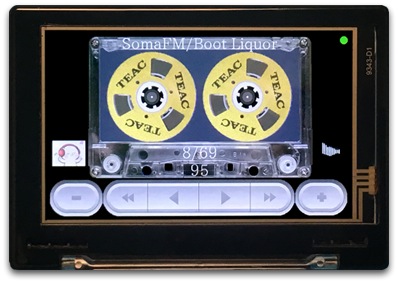
Retro style WebRadio
レトロスタイルのWebRadio 2023.09.28
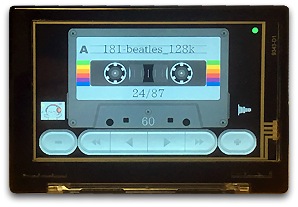
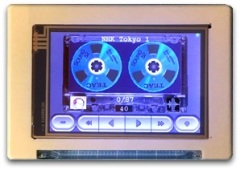
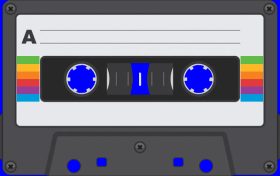
レトロなカセットテープとオープンカセットテープを表示。
懐かしき カセットテープリールの回転と
TEAC Open Reel Cassette Tapeの回転を再現してみました。
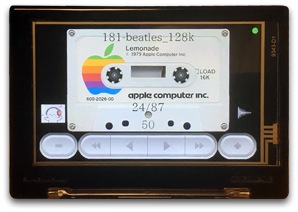
そして アップル好きには 懐かしき Apple Cassette を。
| Cassette Tape | |
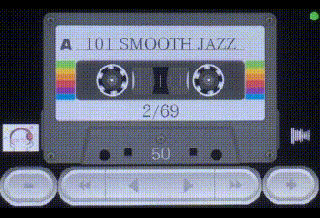 |
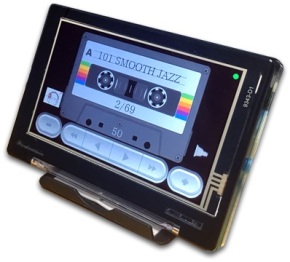 |
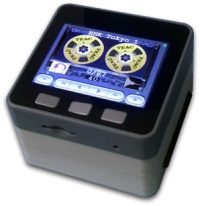
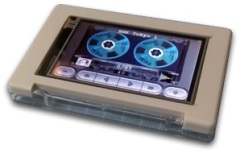
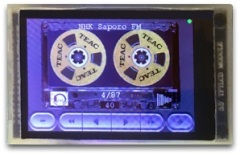
| Open Reel Cassette Tape | |
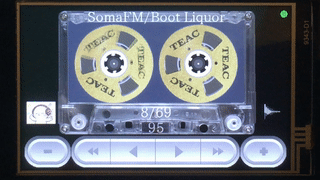 |
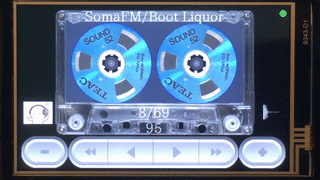 |
.
操作:
1. Volume -,+:Audio出力を増減。
2. Station -10,+10:Stationを-10,+10ステップで増減。
3. Station -1,+1:Stationを1ステップ増減。
4. BackColor Change:Color Pickerが表示され色を選択します。
5. Invert on/off:Colorを反転。
6. Brightness -,+:明るさを増減。
7. OpenTape Change:Gold / Blue の種類を変更。
8. Music on/off:Music動画の表示を on/off。
9. Wave on/off:Wave動画の表示を on/off。
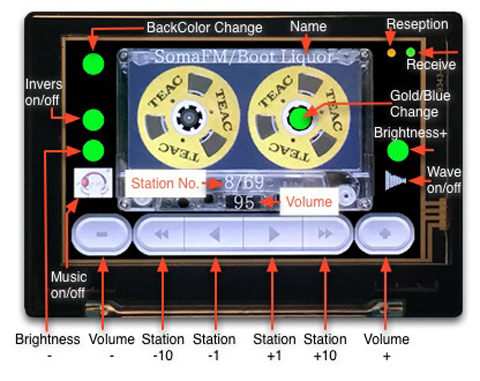
受信について:
Station(局)の受信は 使用WiFiの環境や距離、設定等により影響します。
ノイズが出る場合や受信しづらい局もあります。
その場合は WiFiの近くにしたり、WiFi環境の見直しや Stationをリストから削除します。
局について:
Station(局)は 受信できない時や廃止する場合等があります。
その場合は 削除や新規に登録してみてください。
PCやiPadで受信できる曲があっても、Libraryでは接続できない局は あります。
.
開発環境:
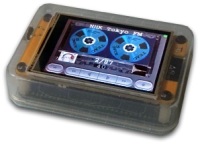
HARD :Making a board of MRB3973 ESP32 S3:
_ 3.97 inch 800×480 16bit Paralell NT35510 LCD Touch XPT2046
SOFT :Arduino IDE 2.2.1, esp32 by Espressif Systems 2.0.11
_ Board : “ESP32S3 Dev Module”
_ Partition Scheme : “8M with spiffs (3MB APP/1.5MB SPIFFS)”
.
.
Down LOAD:
_ DL後 pdf(_.pdf)を削除し zipを解凍。WiFi SSIDとPASSWORDを設定します。
_ Audio出力は I2S DAC MAX98357AとSpeakerをGPIOに接続します。
_ MAX98357AとSpeakerは無くとも画面は表示します。
_ Flash Memory 使用容量:Sketch uses 84% 等と表示し画像容量を判断できます。
| Down LOAD:WebRadio_MRB_Cassett.zip: 3.9″ 800×480 MRB3973 Display:Sketch uses 84% |
|
 |
 |
| Down LOAD:WebRadio_MRB_OpenCassett.zip: 3.9″ 800×480 MRB3973 Display:Sketch uses 91% |
|
 |
 |
| Down LOAD:WebRadio_MRB_AppleCassett.zip: 3.9″ 800×480 MRB3973 Display:Sketch uses 88% |
|
 |
 |
| Down LOAD:WebRadio_M5Stack_OpenTape.zip: 2.0″ 320×240 M5Stack:Sketch uses 84% |
|
 |
 |
| Down LOAD:WebRadio_2432S028R_OpenTape.zip: 2.8″ 320×240 ESP32-2432S028R:Sketch uses 77% The LCD is ILI9341. Youtube:Daradici Levente How to make the easiest RETRO STYLE webradio playerwith touchscreen – ESP32-2432S028 – STEP BY STEP |
|
| New type of board requires ILI9341_2 Driver. | |
 |
 |
| Down LOAD:WebRadio_3248S035C_OpenTape.zip: 3.5″ 480×320 3ESP32-248S035C:Sketch uses 84% |
|
 |
 |
| Down LOAD:WebRadio_MRB3511_OpenTape.zip: 3.5″ 320×480 MRB3511 Display:Sketch uses 50% |
|
 |
 |
.
画像の基本:Little endian と Big endian について。
- jpgやpng画像の .c や .h への変換は Little endian と Big endian があります。
- Big Endian(ビッグ エンディアン), Little Endian(リトル エンディアン) とは
- 数値のメモリーへの格納方法で,
- 数値の上位桁がメモリーの下位にあるような場合に Big endian 。
- 数値の下位桁がメモリーの下位にあるような場合に Little endian と言います。
- 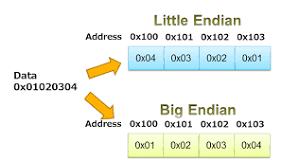
- 🟢 ESP32 は Big endian を使用するとESP内の変換少なく高速になります。
- LovyanGFXにおいて
- Little endian は lcd.setSwapBytes(true);
- Big endian は lcd.setSwapBytes(false); の記述を行う必要があります。
- Webやアプリでの File to C style array converter は endian 選択機能の
- あるものが必要となります。
- ネットの多くの記事は 無意識に Little endian を使用している例が多いです。
.
🔲 静止画と動画の作成と表示方法:
開発環境:
_ Arduino IDE 2.2.1。
_ espressif arduino-esp32 2.0.11。
_ Library:ESP32-audioI2S 3.0.0 Feb.10.2023
_ Library:LovyanGFX 1.1.9。
🟩 静止画の作成と表示する方法。🟦 動画の作成と表示する方法。
🟧 画像を回転する方法。 🟪 Open Reel Type Cassette Tapeの作成。
メモ:画像の範囲は静止画、動画共に四角です、表示不要な部分は透明色を使用します。
_ 透明色の例として説明は「青(RGB 0,0,255)(0x001f)」を使用します。
.
🟩 静止画の作成と表示する方法:
_ 透明色設定と背景色表示の方法も示します。
_ jpg(or png)画像を .h(or .c) 配列に変換します。
1. カセットテープの画像を入手し画像編集アプリで編集します。
_ 周囲や穴を透明色にする為に 例, 青(RGB(0,0,255) : 0x001f) にします。
_ 例:16bit RGBの c3.jpg ができます。
_ カセットとボタンの例:青色が透明。背景色が黒の時は黒色になります。
_ 

2. 画像を Binary File 変換:
_ Web の File to C Style array converter に接続し jpg を Hex (0x0000 – 0xFFFF) に変換。
_ 入力、設定、出力の方法:入力は c3.jpgとします。
_ 2-1. Select a file=[ファイルを選択]し画像を設定します。
_ 2-2. Code format=Hex(0x00)。:0x0000 から 0xffff 表示にします。
_ 2-3. Pallet mod=16bit RGB。 :16bit RGB (65536色)です。
_ 2-4. endianness=Little-endian。:pushImage命令は Little-endian です。
_ :Sprite命令は Big-endian です。
_ Little-endian, Big-endian の区別は 理由不明ですが 表示できる設定です。
_ Library LovyanGFX内では Little-endian で処理と聞いています。
_ 2-5. Data type=unit16_t。:16bitです。
_ 2-6. [Convert]。: 16bit Data を出力します。下にResultが表示されます。
_ 2-7. [save as file]。 :名称等を修正し[save as file] し c3.h を取得します。
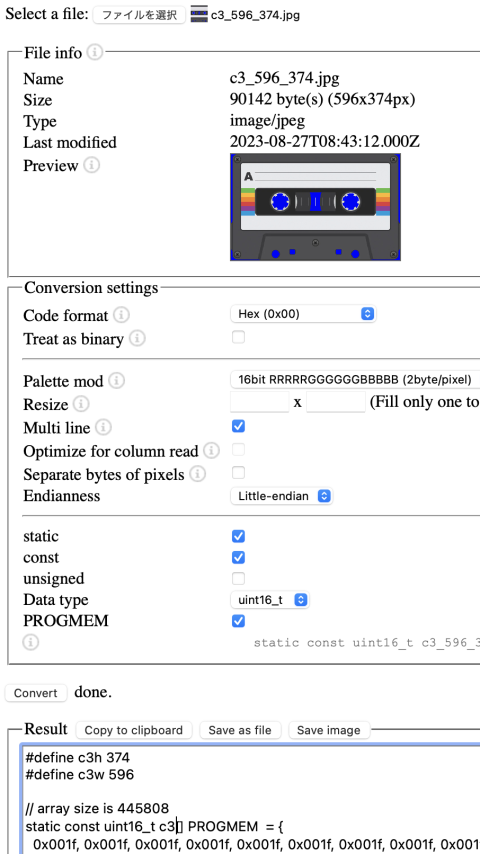
3. 変換後に c3.h ができます。中身は以下で、名前の変更は可能です。
_ サイズは横=596, 縦=374 pixel。色 16bit。Endianness=Little-endianです。
4. Arduino IDEで使用します:
_ (uint16_t)0x001f:青色が透明になり、背景色が表示されます。
_ #include “C/c3.h” // 596×374 cassette
_ tft.pushImage(102,5,c3w,c3h,(uint16_t *)c3,(uint16_t)0x001f);
_ 参考:LovyanGFX 1_simple_use
_ メモ:静止画:青(RGB 0,0,255),Little-endian, 0x001f, 透明色マスク 0x001f
.
.
ボタン画像:
1. 画像は無料画像を参照したりGraphicsソフトで作成します。
2. ボタンは以下の構成で 緑は Pushした時のボタンです。
3. 青(RGB : o,o,255)は 透明色に設定し背景色で表示されます。
4. ボタンの間は空白か黒の縦線を入れます。
5. 12(6×2)個のボタンでは🔴メモリー不足になります。
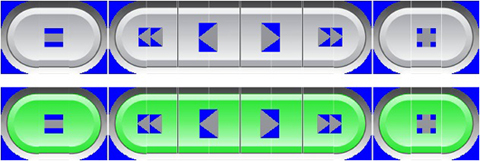
6. 以下6つのボタンと記号(-,+,<<,<,>>,+)を組み合わせて作ります。
_ 部品毎の x, y, 縦幅x、横幅y の値を 配列に記載します。
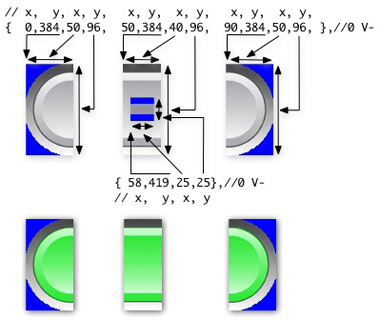
配列:ボタンの位置を設定します。
int c[6][24]={     // Button display position
//                                                            B_          ,  -,<<.<,>,>>,+
// 0,  1, 2, 3,   4,  5, 6, 7,   8,  9,10,11,  12, 13,14,15,  16, 17,18,19,  20, 21,22,23
// x,  y, x, y,   x, y,  x, y,   x, y,  x, y,   x,  y, x, y,   x,  y, x, y,   x,  y, x, y
{  0,384,50,96,  50,384,40,96,  90,384,50,96,   0,  0, 0, 0,   0,  0, 0, 0,  58,419,25,25},//0 V-
{142,384,50,96, 192,384,40,96, 220,384,40,96,   0,  0, 0, 0, 260,384, 2,96, 192,419,32,25},//1 <<
{262,384,40,96, 301,384,40,96, 341,384,40,96, 357,384,40,96, 397,384, 2,96, 318,413,25,38},//2 <
{399,384,40,96, 439,384,40,96, 479,384,40,96, 495,384,40,96, 535,384, 2,96, 458,413,25,38},//3 >
{537,384,40,96, 577,384,40,96, 605,384,50,96,   0,  0, 0, 0,   0,  0, 0, 0, 573,419,32,25},//4 >>
{657,384,50,96, 707,384,40,96, 747,384,50,96,   0,  0, 0, 0,   0,  0, 0, 0, 716,419,25,25} //5 V+
};
ボタンとタッチ操作:ボタン画像に合わせタッチの範囲を設定。
int b[6][12]={     // Button mouse position
//    frame      ,  button         ,  nomen
// 0,  1,  2, 3,4,   5,  6,  7, 8,9   10, 11
//x1, y1, x2,y2,r,  x3, y3, x4,y4,r,  x5, y5
{  0,420,150,60,5,   2,422,146,56,5,  30,430}, // Bd 0 VOL-
{161,420, 72,60,5, 163,422, 68,56,5, 170,425}, // Bd 1 <<
{244,420,150,60,5, 246,422,146,56,5, 275,428}, // Bd 2 <CH
{406,420,150,60,5, 408,422,146,56,5, 440,428}, // Bd 3 CH>
{566,420, 72,60,5, 568,422, 68,56,5, 575,425}, // Bd 4 >>
{650,420,150,60,5, 652,422,146,56,5, 670,430}  // Bd 5 VOL+
};
LCD画面サイズと各表示画像のサイズと表示方法。
1. M5Stack, 2432S028Rの画面サイズは、320×240。
_ Volumeボタンの画像は 56×38 pixel , Little endian で表示。
_ Opentape画像は 117×117 , Big endian , Splite 1倍で表示。
2. 3248S0535C,MRB3511の画面サイズは、480×320。
_ Volumeボタンの画像は 56×38 pixel , Big endian , Splite 1.5倍で表示。
_ pushRotateZoomWithAA アンチエイリアスでの画像の綺麗さは 1.5倍程度までで
_ それ以上にしますと画像の角が目立ち綺麗で無くなります。
_ Opentape画像は 160×160 , Big endian , Splite 1倍で表示。
3. MRB3973の画面サイズは、800×480。
_ Volumeボタンの画像は 140(50+40+50)x96 pixel を表示。
_ Opentape画像は 239×239 , Big endian , Splite 1倍で表示。
.
.
🟦 動画の作成と表示する方法:
gifを入手するか 画像編集アプリで作成し jpgへ変換します。
次に .h 配列に変換し xxx.h を作成。
Arduino IDEで xxx.h 配列を使用してLCD に動画を表示します。
gifを .h 配列に変換する方法:
1. gif 画像入手先:1. GIFER。 2. tenor。
2. gif から jpg変換:
_ EZGIF.COM ANMATED GIFS MADE EASY に接続します。
_ GIFのアップ(Max file size: 50MB)と使用する範囲を設定:
_ Crop animated GIF image:Upしサイズを選択し「Crop image!」を選択。
_ Cropped image: が作成されます。
_ 出力サイズの設定:
_ 「resize」を選択し使用サイズを入力し「Resize image!」選択。
_ Resized image: が作成されます。
3. jpgデーター出力:
_ 「Split」を選択します。
_ 「Split options:」で「Output images in JPG Format」を選択し
_ 「Split to frames!」選択。
_ 「Split images:」が表示されます。
_ 「Download frames as ZIP」を選択し xxx.zip Fileを取得します。
_ この zip File には gIfを構成する JPG File が多数あります。
JPG to .h 変換:
_ .h : プログラム用のメモリデータ、Arduino IDEで利用できるソースコードです。
_ 説明:Making animation from GIF files for TFT screen (ESP32 ,
4. 変換Tool:TFTAni.zip (TFTAnimations.exe):
_ 作者 VolosR氏に感謝! 。VolosR氏は TTGO製品で数々の作品を作成しています。
_ TFTAnimationsは Windowsソフトですので Winか Macでは wine 2.0で変換します。
5. 3. で取得した jpg file を TFTAnimations.exe で frame.h に変換します。
_ frame.h が作成されます。これは 複数のjpgを .hの配列に変換されたファイルです。
_ frame.h は Arduino IDEにて 文字形式のエラーが出る為、事前にTextアプリ等で
_ 通常の文字形式に変換します。
メモ:動画はメモリーを多く使用する為、50×50 pixel 程度が目安です。
 |
 |
 |
.
🟧 画像を回転する方法:
_ 例:カセットテープのリール(reel)を回転させる。
_ File to C Style array converter に接続し jpg を .h に変換します。
_ 2-4. endianness=Big-endian。:Sprite命令は Big-endian です。
_ 回転させる静止画像を用意し Sprite命令の[pushRotateZoom]を使用します。
_ sprite.pushRotateZoom(&tft,278,172,radian,1(倍),1(倍), (uint16_t)0x001f);
_ 

_ メモ:Spriteでの青は Big-endianで 0x1f00 となり 透明色マスクは 0x001fです。
:
_ メモ:SpriteでなくpushImageでの回転方法:
_ 9度づつ回転した20枚の画像を配列にし pushImageで抽画します。
_ 使用容量は 8%増えます。
.
.
🟪 Open Reel Type Cassette Tapeの作成:
1. Cassette Caseの画像を 🟩 静止画の作成と表示する方法 で作成します。
2. Open Reel Tape画像を 🟧 画像を回転する方法 で作成します。
_ 
3. 注意:サイズが大きい時は表示時間がかかり 受信不良になる場合があります。
_ 
_ 
_ メモ:WebRadio受信の Loop 内のサイクルは 約25msec 程度です。
_ 大きな画像の場合は表示に時間がかかります。
_ 受信に必要な約25msecより画像表示の時間が大きい時は 受信不良になります。
_ この条件でスムーズにReelを回転させるのは、計算が必要です。
_ Spliteは 1.5倍以上にすると角がスムーズになりにくく倍率の程度をわきまえます。
_ 完璧ではありませんが、今回の程度にしました。
.
.
感想:
デジタル文字表示だけでは 物足りなく
懐かしいアナログ的なカセットテープやオープンカセットテープを再現したく作りました。
静止画像と動画の基本が勉強になり、直ぐ忘れますので備忘録としてまとめました。
,
レトロなスタイルのオーディオ プレーヤー:この記事に触発されました。
FAUX-RETRO “TAPE” PLAYER RUNS ON ESP32 AND 80S VIBES
,
,
,
,

Hi Great work.
We have an issue with some stations in Greek language and i guess you have the same with japanese stations that appear in Kanji,
How do you resolve the issue of a different character set in the name of the station?
telloglouike
3月 23, 2024 at 12:51 am
Change the different characters in Station.h to suit you.
macsbug
3月 27, 2024 at 3:30 am
Unfortunately, your sketch WebRadio_2432S028R_OpenTape.zip doesn’t work on my CYD ESP32-2432S028R. It seems to be the wrong driver for the display. It has to be ILI9341_2 and not ILI9341 (see Arduino library TFT_eSPI). What can I do to get it work?
Hans
4月 4, 2024 at 3:42 am
There are multiple types of ESP32-2432S028R.
A new version is ILI9341_2.
I only have the early version.
Therefore, ILI9341_2 cannot be confirmed.
I don’t use TFT-esPI.
:
TFT_eSPI has the following articles.
#define TFT_RGB_ORDER TFT_BGR // Colour order Blue-Green-Red
#define TFT_INVERSION_ON //if the colours are wrong try the other setting
https://github.com/Bodmer/TFT_eSPI/discussions/3018
:
ILI9341_2:
1. TFT_RGB_ORDER of ILI9341_2 is BGR.
2. TFT_INVERSION of ILI9341_2 is ON.
Modify lgfx_ESP32_2432S028.h
cfg.invert = false; // パネルの明暗が反転場合 trueに設定
cfg.rgb_order = false; // パネルの赤と青が入れ替わる場合 trueに設定
From below.
cfg.invert = true; // パネルの明暗が反転場合 trueに設定
cfg.rgb_order = true; // パネルの赤と青が入れ替わる場合 trueに設定
I added the modified version for ILI9341_2 to the Blog.
Please download.
macsbug
4月 4, 2024 at 5:56 am
Unfortunately, it doesn’t work. If I set cfg.offset_rotation to 7 I can see animation in right direction but it only fills about 70% of the screen (at the right site). What else can I try?
Hans
4月 4, 2024 at 6:37 am
I can’t try it because I don’t have ILI9341_2.
There are also no specifications for ILI9341_2.
TFT-eSPI and LovyanGFX require settings to match the LCD.
:
Match the LovyanGFX settings to tft.setRotation(1); or tft.setRotation(3); in setup.
Please try other settings of LovyanGFX.
macsbug
4月 4, 2024 at 8:32 am
tft.setRotation is a command of TFT_eSPI and that isn’t used in your sketch. I need a solution for LovyanGFX.
Hans
4月 4, 2024 at 6:01 pm
OK, I found a solution for this problem. But there are a few more.
I set cfg.panel_width = 440; in lgfx_ESP32_2432S028.h and the screen is ok. But now the touchscreen doesn’t match the screen. I have to figure out how the settings have to be.
Hans
4月 4, 2024 at 7:10 pm
…and is it possible to play music using a speaker connected to the speaker pins? What have I to change to make it work?
Hans
4月 4, 2024 at 7:26 pm
The early ESP32-2432S028R’s Audio AMP was poorly designed and does not produce good sound.
So I used his I2S DAC (MAX98357a, PCM5102A, UDA1334A).
:
The Audio AMP improvement article can be found below.
https://github.com/hexeguitar/ESP32_TFT_PIO#adding-psram
:
ESP32-2432S028 aka Cheap Yellow Display – fixing the audio issues
macsbug
4月 12, 2024 at 8:55 am
Your audio output is managed over a MAX98357A module, is that right? To what pins have I connect the module?
Is the output through PA connector possible? How can I manage this?
Hans
4月 4, 2024 at 10:53 pm
I contacted the developer of LovyanCFX library and he inserted another driver: ILI9341_2. With that driver it works perfect without the need to change settings except orientation of display and touch (7).
The only issue I have is the one with audio.
Hans
4月 8, 2024 at 7:10 am
Thank you for contacting the developer of the LovyanCFX library.
That helps a lot.
Please let me know the list.
macsbug
4月 12, 2024 at 8:51 am
@macsbug
„The early ESP32-2432S028R’s Audio AMP was poorly designed and does not produce good sound.
So I used his I2S DAC (MAX98357a, PCM5102A, UDA1334A).“
I know, but what pins do you use and how to set up? I did the changes of audio AMP and use a MAX98357 but the sound is still poor. The gain is far too high and sound is clipping and I found no solution to make it better.
Hans
4月 12, 2024 at 11:23 am
by the way: My CYD is the one with the 2 USB
Hans
4月 4, 2024 at 6:03 pm
The boards just arrived and last week and trying to compile i get an error Audio.h library missing. Any ideas
telloglouike
4月 10, 2024 at 9:18 pm
Please make sure that the Arduino libraries folder contains the following:
https://github.com/schreibfaul1/ESP32-audioI2S/tree/master
macsbug
5月 6, 2024 at 5:57 pm
Followed Exactly your instructions with ESP32-2432S028R and Max98357 I2S 3W Class D Amplifier
but I get errors, ANY ADVICE?
C:UsersStratisDocumentsArduinolibrariesAudio_-_Adafruit_Fork/AudioStream.h:71:10: fatal error: kinetis.h: No such file or directory#include “kinetis.h”^~~compilation terminated.exit status 1
xxArduinolibrariesAudiosrc/Audio.h:16, from xxwebradio_2432s028r_opentapeWebRadio_2432S028R_OpenTapeWebRadio_2432S028R_OpenTape.ino:67: xxArduinolibrariesAudiosrc/DAC.h:21:15: error: expected ‘)’ before ‘*’ token DACClass(Dacc *_dac, uint32_t _dacId, IRQn_Type _isrId) :
telloglouike
4月 12, 2024 at 2:48 am
Please make sure that the Arduino libraries folder contains the following:
https://github.com/schreibfaul1/ESP32-audioI2S/tree/master
macsbug
5月 6, 2024 at 6:01 pm
Connecting correclty to WIFI
Showing Correctly the cassete
but in ALL stations i get message DO not recieve
open the URLS in chrome browser , they play correctly
but not in Arduino
Changed the https to http but problem IS NOT SOLVED
telloglouike
4月 29, 2024 at 4:21 am
There are multiple downloads.
Which Download?
macsbug
5月 6, 2024 at 5:52 pm
tried this but problem DO NOT RECIEVE i still on
I have CYD 2.8″ 320×240 ESP32-2432S028R
and tried to use this download without a DAC first to make sure that SW is working and then correct distorted sound but i still get do not recieve error
Down LOAD: WebRadio_2432S028R_OpenTape.zip :
2.8″ 320×240 ESP32-2432S028R :Sketch uses 77%
The LCD is ILI9341.
Youtube: Daradici Levente
How to make the easiest RETRO STYLE webradio
player with touchscreen – ESP32-2432S028 – STEP BY STEP
telloglouike
5月 6, 2024 at 9:30 pm
I don’t understand what CYD is.
I don’t have CYD 2.8″ 320×240 ESP32-2432S028R.
I heard that CYD’s LCD Driver is his ST7789.
:
>Down LOAD: WebRadio_2432S028R_OpenTape.zip :
The LCD Driver for this is ILI9341.
I did DowlLoad and set the Wifi SSID and PassWord.
It is being received and working with “1. ESP32-2432S028R v1 (ILI9341 SPI)” that I am using.
:
I am currently ordering the latest “ESP32-2432S028R”.
I’ll look into it when it arrives.
:
CYD is ST7789, but he doesn’t understand the story with ILI9341.
It’s better to check each one from the beginning.
macsbug
5月 6, 2024 at 11:18 pm
CYD Short for Cheap Yellow Board is the ESP32-2432S028 from SUnton Store
https://www.aliexpress.com/item/1005004502250619.html?spm=a2g0o.order_list.order_list_main.5.1a2b1802tvdjM5
Order date Order date: Mar 13, 2024
SO first i try the SW AS IS(Using your station URL) without adding Any DAC like the 98357 to make sure SW works
then my next step is to improve Audio,
But the Software loaded as it is in the March Order , connects to wifi and then shows me an error “do not receive” on all of your URL stations
this is BEFORE adding any DAC,
Can you advise with the mistake>
telloglouike
5月 6, 2024 at 11:31 pm